آیا می خواهید یاد بگیرید که چگونه تصاویر زیبا رد ستارگان را ایجاد کنید؟
شما می توانید این کار را انجام دهید، اما باید گام به گام پیش بروید.
.رم در یک روز ساخته نشده است
این یک راز نیست که حتی بهترین نویسندگان، بهترین نقاشان، بهترین عکاسان از پایین به مقیاس جلال رسیده اند. سخت کار کردن، یادگیری و تمرین کردن… تمرین با “الهام گرفتن” از متخصصان.
چرا؟
هر معلم آن را می داند.
“از آنجا که قبل از اینکه بتوانید آزاد پرواز کنید و سبک شخصی خود را ایجاد کنید ، ابتدا باید آن را صحیح یاد بگیرید.”
قبل از اینکه بتوانید کتاب بنویسید ، ابتدا باید یاد بگیرید که چگونه یک نسخه خوب را بنویسید.
به همین سادگی.
و سریعترین راه برای رسیدن به یک سطح قابل قبول از تخصص، بدون توجه به آنچه شما می خواهید یاد بگیرید، کپی کردن مواردی است که منجر به موفقیت می شوند.
برای یک ثانیه در مورد آن فکر کنید. یادت هست چطور یاد گرفتی بنویسی؟
با تمرین و کپی کردن کلماتی که عالی نوشته شده بود، درست است؟
خب ، در عکاسی دقیقاً یکسان است. با گرفتن عکس های عالی (حتی اگر ایده های شما نیستند) یاد می گیرید که چگونه عکس های عالی بگیرید (ایده های خود).
بدیهی است اخلاق در درجه اول پیش می رود! پس عکس هایی که کپی می کنید را منتشر نکنید: شما نمی خواهید متهم به سرقت شوید. آنها را برای خود نگه دارید. اینها فقط تمرین هستند.
بنابراین، این راهنما را بخوانید و تئوری ها را بیاموزید ، به دنبال تصاویر رد ستارگان که عاشق آن هستید در اینترنت بگردید و اقدام کنید ، آنها را تکرار کنید و سعی کنید خودتان عکسهای اصلی و چشمگیری بگیرید.
“شما باید قوانین بازی را یاد بگیرید. و پس از آن شما باید بهتر از هر کس دیگری بازی کنید.” – آلبرت انیشتین
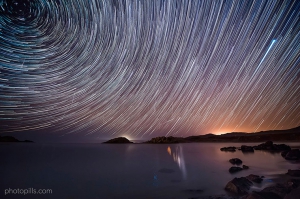
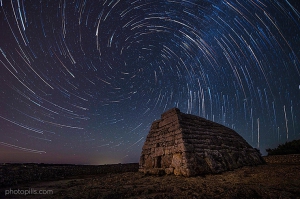
1. صلیب
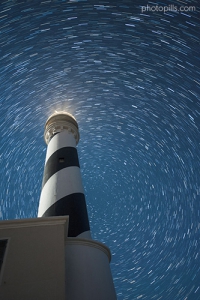
احتمالاً راحت ترین و در عین حال قدرتمندترین تصویر از رد ستارگان.
موضوع خود را انتخاب کنید. تمرکز قاب بندی خود را روی قطب شمال (ستاره شمالی) یا قطب جنوبی (نیمکره جنوبی) بگذارید.
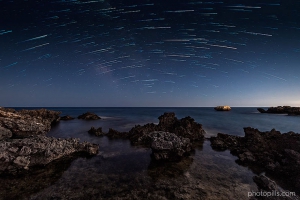
2. جادوی خط استوای آسمانی
دوربین خود را به سمت شرق یا غرب قرار دهید. در آنجا خط استوائی آسمانی پیدا خواهید کرد و خواهید دید که چگونه ستاره ها سه مسیر مختلف را دنبال می کنند.
در خط استوای آسمانی، ستاره ها یک خط مستقیم را دنبال می کنند. اما آنها تمایل دارند که از هر دو طرف استوا منحرف شوند. این یک الگوی بسیار دیدنی است.
3. درهم آمیختگی با مسیرهای نور مصنوعی
چرا معرفی مسیرهای نوری مصنوعی در پیش زمینه نیست؟
بازی با مسیر رد ستارگان و همچنین چراغ های وسایل نقلیه در حال حرکت سریع، می تواند نتایج بسیار خوبی به شما بدهد.
4. به قوس درآوردن بالای موضوع شما
در نیمکره شمالی ایستادن و به سمت جنوبی قاب بندی کردن به شما قدرت می دهد موضوع خود را در زیر رد ستارگان زیبا قفل کنید. این یک داستان کاملا متفاوت است!
در نیمکره جنوبی ، فقط قاب شمال
5. بازتاب آب
عکاسی از بازتاب رد ستارگان روی آب…
آنجا که آب وجود دارد ، زندگی وجود دارد!
6. عکاسی از رنگ ستارگان
ستاره ها سفید نیستند! غافلگیر شدید؟
بله ، در نگاه اول ، به نظر می رسد سفید هستند. اما حقیقت این است که ستارگان طیف وسیعی از رنگها را پوشش می دهند: طلایی، آبی ، سفید و حتی قرمز. این به دلیل دمای متفاوت سطح آنهاست.
گرفتن عکس از رنگ طبیعی آنها در مکانی به دور از آلودگی نوری بسیار آسانتر است.
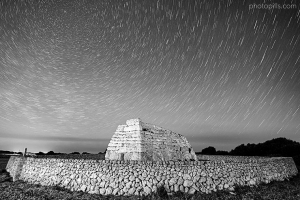
7. ارتباط با گذشته
هدف در اینجا ایجاد ارتباط بین ستارگان و یکی از آن ساختمانهای نادریست که اجداد ما برای بهره مندی ما برجای گذاشتند.
این عکس، خط استوائی آسمانی و کهکشان راه شیری را به همراه یک گنج واقعی نشان می دهد: Naveta d’es Tudons – یک مقبره برجسته اتاق بزرگ مگلیتیک واقع در منورکا. این ساختمانی است که بین سالهای 1200 تا 750 قبل از میلاد به عنوان محل نگهداری استخوان های مردگان استفاده میشده است!
8. رد ماه
گاهی اوقات ، قرار دادن تصویر ماه در قاب می تواند لمس خوش آب و رنگ و درستی را به تصویر ببخشد. شما چی فکر میکنید؟
9. دوش بزرگ شهاب سنگ
سپری کردن تمام شب برای عکاسی از یک شهاب سنگ می ارزد. این کار را انجام دهید و نه تنها تصاویر خیره کننده ای خواهید گرفت ، بلکه می توانید تصاویر شگفت انگیز رد ستارگان را به فیلم های Timelapse تبدیل کنید.
نگاهی به راهنمای ما برای بهترین دوش شهاب سنگ بیندازید. شما همه چیز را برای استفاده بیشتر از این نمایش های طبیعی در اواخر شب یاد خواهید گرفت: وقتی آنها اتفاق می افتند و چگونه به آنها شلیک کنید ، قدم به قدم.
10. از داخل به بیرون
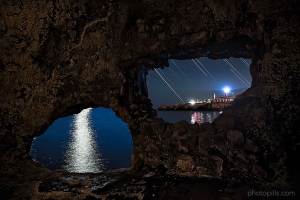
تصور کنید که بعد از یک روز پیاده روی ، در داخل یک غار استراحت می کنید و از ستاره ها و آسمان شب لذت می برید…
ناگهان ستاره ها شروع به اثرگذاشتن از خودشان می کنند.
قلب شما از سینه به بیرون خواهد پرید!
11. مناظر شهری

در این تصویر چه می بینید؟
من دو دشمن را می بینم که برای رسیدن به سنسور دوربین می جنگند: ستاره ها و سازندگان آلودگی نوری: چراغ های شهر.
جدای این ، این تصویر سرنخی را به من نشان می دهد که ستاره ها قبل از این همه دخالت های انسانی ، چقدر زیبا به نظر میرسیده اند.
من از یک فیلتر GND دو مرحله ای استفاده کردم که چراغ های شهر را کم نورتر می کند. بنابراین توانستم نوردهی طولانی تری بدون خراب شدن نور چراغهای مصنوعی در پیش زمینه، انجام بدهم.
12. نمایش منطقه متروکه
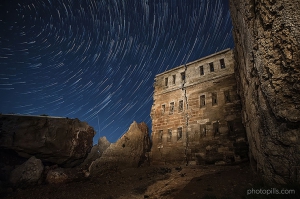
رد ستارگان برای ایجاد تصویر شبح مانند در اطراف یک ساختمان متروکه بسیار عالی است.
در تصویر بالا می توانید ویرانه های یک پایگاه نظامی باستانی را ببینید. در قلعه لا مولا ، در منورکا واقع شده است.
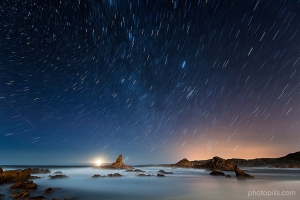
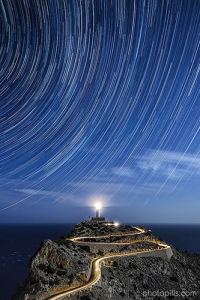
13. سوژه تنها
قرار دادن یک موضوع عمودی به تنهایی در پیش زمینه ، تصویر را جذاب تر و خیره کننده تر می کند.
به دنبال یک درخت ، یک سنگ یا یک فانوس دریایی باشید … به دنبال موضوعات شگفت انگیز باشید ، آنها را در پیش زمینه خود بگنجانید و تصاویر خیره کننده ای از رد ستارگان خلق خواهید کرد.
14. بازی با آتش
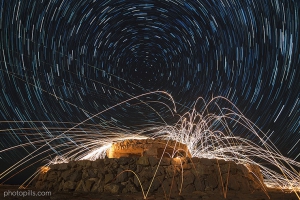
آیا تابحال نور را با پشم فولادی نقاشی کرده اید؟ این واقعا قاب را مشتعل می کند!
تنها کاری که باید انجام دهید اینست که مقداری پشم فولادی را به یک غلتک رنگ بچسبانید ، آن را آتش بزنید و بغلتانید.
اما مراقب باشید ، زیرا می تواند بسیار خطرناک باشد!
15. پانوراما ، کل داستان
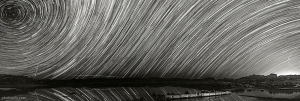
کمی چالش برانگیز است ، اما نتیجه تلاش خود را خواهید دید. اگر یکی بسازید، معتاد خواهید شد…
و هر کسی که تصویر شما را ببیند ، این کار را انجام خواهد داد.
16. چهره های انسانی
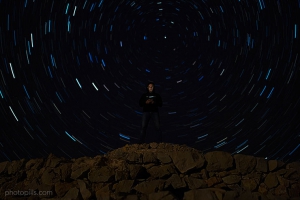
چهره های انسانی به شما این امکان را می دهد که با بازی با بسیاری از ترکیب های مختلف ، تصاویر بسیار جذابی ایجاد کنید.
در اینجا ، شما این قدرت را دارید که تصمیم بگیرید که الگوی شما کجاست و چه داستانی را می خواهید بگویید.
17. سیاه و سفید
چرا سعی در تغییر چیزهای مختلف نکنیم؟
نظرتان در مورد عکس سفید و سیاه چیست؟ ؛)
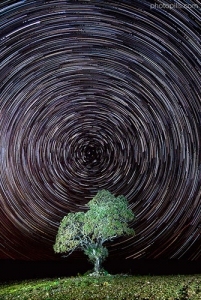
18. گرداب هیپنوتیزم
این عکس ملکه تمام تصاویرهیپنوتیزم است!
شما می توانید دنباله های چرخشی گرداب را در خانه با ویرایش در زمینه و با استفاده از یک سیستم موتوری برای تغییر یکنواخت فاصله کانونی در هنگام باز بودن پرده شاتر تولید کنید.
شما همچنین می توانید این کار را به صورت دستی انجام دهید ، اما احتمال زیاد وجود دارد که عکس را خراب کنید.
19. رد ستارگان فکوس نشده
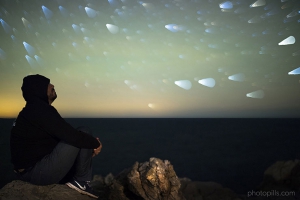
با تغییر مکان تدریجی ستاره ها در طی یک نوردهی طولانی و یا بعد از هربار نوردهی ، آنچه را “اثر ستاره دنباله دار” یا “اثر توپ بدمینتون” می نامند ، میتوانید ایجاد می کنید.
چگونه می توانید ستاره ها را جابجا کنید؟
تمام کاری که شما باید انجام دهید اینست که حلقه فوکوس لنز خود را چند درجه بچرخانید تا عمق میدان را به دور از بی نهایت بکشید.
20. تایم لپس یا ستاره های دنباله دار در حرکت
اگر فکر می کنید ایجاد یک تصویر از رد ستارگان جالب است ، شما عاشق دارید تایم لپس با ستاره های دنباله دار در حرکت خواهید شد. به جای اینکه تمام عکس ها را برای تولید یک تصویر واحد تهیه کنید، فقط آنها را به یک ویدیو تبدیل کنید. و ستاره ها را در حال حرکت به جهانیان نشان دهید.
21. نوبت شماست
من فکر می کنم جالب تر است که بیست و یکمین تصویر الهام بخش را شما پیشنهاد دهید.
این مقاله را بخوانید و عکس های خود را با ما به اشتراک بگذارید!
https://www.photopills.com/articles/star-trails-photography-guide
Do you want to learn how to create beautiful Star Trails images?
You can make it happen, but you need to go step by step.
Rome wasn’t built in a day.
It’s not a secret that even the best writers, the best painters, the best photographers reached the glory scaling from the bottom. Working hard, learning and practicing… Practicing by copying the masters or, to say it in a softer way, by “getting inspired” by the masters.
Why?
Every teacher knows it:
“Because before you can fly free and create your personal style, you need to get it right first.”
Before you can write a book, you need to learn how to write good copy first.
That simple.
And the fastest way to reach an acceptable level of expertise, no matter what you’re trying to learn, is by copying the ones that lead, the ones that master the topic.
Think about it for a second. Do you remember how you learnt how to write?
Yes, you do.
By practicing. By copying words perfectly written, right?
Well, it’s exactly the same in photography. By shooting great photos (even if they’re not your ideas), you learn how to take great photos (your ideas).
Obviously, ethics goes first!
Don’t publish the photos you’re copying: you don’t want to be accused of theft. Keep them for you. These are just exercises.
At this stage, when learning, it’s all about getting the feeling, getting more comfortable when composing, shooting and editing your images.
So, read this guide, learn the theory, look for Star Trails images you love on Internet and take action, replicate them and before you realize it, you’ll be taking you own original and striking photos.
“That’s great Toni, but I don’t have time to look up for images on the Internet now.”
Ok, fine…
You can start with the following Star Trails ideas 😉
“You have to learn the rules of the game. And then you have to play better than anyone else.” – Albert Einstein
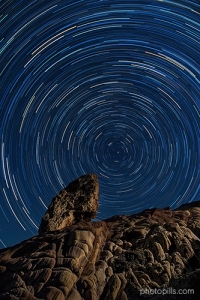
1. Circumpolar
Nikon D700 | 24mm | f/2.8 | 30s (total exposure time: 10min 30s) | ISO 1600 | 3850K | 21 photos edited in Lightroom and stacked with StarStaX
Probably the easiest, but also the most powerful Star Trails image. Choose your subject, frame at the Polaris (North Star) or the south celestial pole (Southern Hemisphere) and you can’t get it wrong!
2. The celestial equator magic
Nikon D700 | 14mm | f/2.8 | 10min 11s (single exposure) | ISO 200 | 3400K
Aim your camera to the east or west and the story changes. There, you’ll find the celestial equator and you’ll see how stars follow three different paths.
On the celestial equator, stars follow a straight line. But they tend to curve away on both sides of the equator. This is a very spectacular pattern.
3. Mixed with artificial light trails
Nikon D4s | 24mm | f/4 | 30s (total exposure time: 1h 20min) | ISO 800 | 3850K | 166 photos edited in Lightroom and stacked with StarStaX
Why not introducing artificial light trails in the foreground?
Playing with both Star Trails and the lights of fast moving vehicles can give you great results too.
4. Arching above your subject
Nikon D4s | 14mm | f/2.8 | 21s (total exposure time: 1h 40min 48s) | ISO 3200 | 4700K | 288 photos edited in Lightroom and stacked with StarStaX
In the Northern Hemisphere, framing south gives you the power to lock your subject under the beautiful Star Trails. It’s a totally different story!
In the Southern Hemisphere, just frame north 🙂
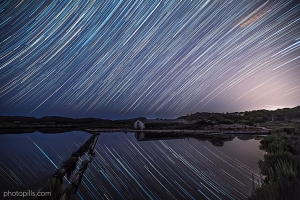
5. Water reflections
Nikon D4s | 14mm | f/2.8 | 30s (total exposure time: 1h 16min) | ISO 6400 | 3400K | 152 photos edited in Lightroom and stacked with StarStaX
I love capturing the Star Trails reflex on the water.
Where there is water, there is life!
6. Capturing the color of the stars
Nikon D4s | 20mm | f/4 | 30s (total exposure time: 1h 24min) | ISO 1600 | 3850K | 168 photos edited in Lightroom and stacked with StarStaX
Stars are not white!
Surprised?
Yes, at first glance, they seem to be white. But, the truth is that stars cover a range of colors: gold, blue, white and even red. This is caused by their different surface temperatures.
Capturing the natural color is easier when you’re shooting in a light pollution free location. In section 3 you’ll learn how to capture the real color of the stars.
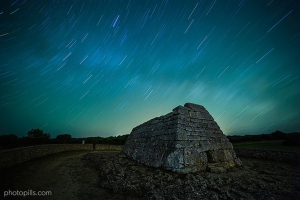
7. Connecting with the past
Nikon D4s | 14mm | f/2.8 | 24min 11s (single exposure) | ISO 200 | 2718K
The goal here is to build a connection between the stars and one of those rare buildings that our ancestors left for us to enjoy.
The photo shows the celestial equator and the Milky Way together with a true treasure: the Naveta d’es Tudons – a remarkable megalithic chamber tomb located in Menorca. It’s a building that served as a collective ossuary between 1200 and 750 BC!
8. Moon trails
Nikon D4s | 16mm | f/4 | 30s (total exposure time: 51min 30s) | ISO 800 | 3450K | 103 photos edited in Lightroom and stacked with StarStaX
Sometimes, including the Moon in the frame can give the right spicy touch to the image. What do you think?
9. A big Meteor Shower
Nikon D4s | 14mm | f/2.8 | 30s (total exposure time: 5h 23min 30s) | ISO 5000 | 3400K | 103 photos edited in Lightroom and stacked with StarStaX
Spending the whole night shooting a Meteor Shower pays off. Do it, and you’ll not only take stunning still images, you’ll also be able to create amazing Star Trails images and timelapse videos.
Take a look at our guide to the best Meteor Showers. You’ll learn everything you need to make the most of these natural late night shows: when they happen and how to shoot them, step by step.
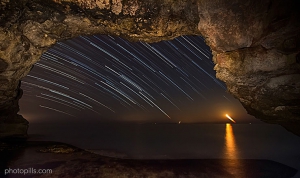
10. Inside out
Nikon D4s | 24mm | f/4 | 5s (total exposure time: 1h 5min 30s) | ISO 800 | 3150K | 786 photos edited in Lightroom and stacked with StarStaX
Imagine that after a long day hiking, you’re comfortably resting inside a cave, enjoying the stars and the night sky…
Suddenly, the stars begin to trail.
Your heart would jump out of your chest!
11. Urbanscapes
Nikon D4s | 14mm | f/2.8 | 30s (total exposure time: 1h 15min) | ISO 6400 | 4500K | Soft GND 0.6 (2 stops) filter for the city lights exposure | 150 photos edited in Lightroom and stacked with StarStaX
What do you see in this image?
I see two enemies fighting to reach the sensor of my camera: the stars and the light pollution creators – the city lights.
Apart from this, the image gives me a clue of how beautiful the stars would have looked in this place before all these human interferences.
I used a 2-stop soft GND Filter placing using its darker area to dim the city lights. So I got a longer exposure without overexposing the artificial lights on the foreground.
12. The drama of the abandoned
Nikon D4s | 14mm | f/4 | 15s (total exposure time: 1h 20min) | ISO 800 | 3250K | 320 photos edited in Lightroom and stacked with StarStaX
Star Trails are great for creating a ghost like atmosphere around an abandoned building.
In the image above you can see the ruins of an ancient military base. It’s located in the fortress of La Mola, in Menorca.
13. Lonely subjects
Nikon D4s | 14mm | f/2.8 | 30s (total exposure time: 1h 15min) | ISO 6400 | 4500K | 150 photos edited in Lightroom and stacked with StarStaX
Including a vertical and isolated subject in the foreground makes the image more intriguing, more hypnotic.
Look for a tree, a rock, a lighthouse… Look for amazing subjects, include them in your foregrounds and you’ll create dazzling Star Trails images.
14. Playing with fire
Nikon D4s | 14mm | f/2.8 | 8s (total exposure time: 26min 8s) | ISO 1600 | 3200K | 196 photos edited in Lightroom and stacked with StarStaX
Have you ever light painted with steel wool? It truly ignites the frame!
All you have to do is to attach some steel wool to a paint roller, light it and make it roll.
But be careful, because it can be extremely dangerous!
15. Panoramas, the whole story
Nikon D4s | 14mm | f/2.8 | 30s (total exposure time: 1h 15min) | ISO 1600 | 4500K | 150 photos edited in Lightroom and stacked with StarStaX
It’s a little bit more challenging, but it pays off the effort. Create one, and you’ll become addicted…
And so will do anyone who sees your image 😉
16. Human figures
Nikon D4s | 35mm | f/1.4 | 5s (total exposure time: 18min 20s) | ISO 400 | 3500K | 220 photos edited in Lightroom and stacked with StarStaX
Human figures allow you to create very appealing images by playing with many different compositions.
Here, you have the power to decide where you want the model to be and tell the story you want.
17. Black and white
Nikon D700 | 20mm | f/4 | 10min (single exposure) | ISO 400 | 4500K
Why not trying something different for a change?
What about a white and black shot? 😉
18. Hypnotic vortex
Nikon D4s | 14mm | f/2.8 | 30s (total exposure time: 1h 15min) | ISO 6400 | 3250K | 150 photos edited in Lightroom and stacked with StarStaX
It’s the queen of all the hypnotic images!
You can produce the vortex Star Trails at home, editing a single shot, or in the field, using a motorized system to smoothly change the focal length while the shutter is open.
You can also do it manually, but there’s a high chance that you’ll ruin the photo.
19. Defocused Star Trails
Nikon D4s | 35mm | f/1.4 | 60s (total exposure time: 14min) | ISO 1600 | 3500K | 14 photos edited in Lightroom and stacked with StarStaX
By progressively defocusing the stars during a single long exposure or after each exposure (image stacking), you’ll create what’s called the “comet effect” or “badmington shuttlecock effect”.
How can you defocus the stars?
All you have to do is to rotate the focus ring of your lens a few degrees to pull the depth of field far limit away from infinity.
Do it after each exposure if you’re using the stacking technique. Or at a 1-minute interval if you’re shooting a single long exposure.
I explain you exactly how to do it in section 12.
20. Timelapse or Star Trails in motion
If you believe that creating a Star Trails image is fun, you’re going to love creating your own Star Trails timelapses.
Instead of staking all the photos to produce one single image, just turn them into a video. And show the world the stars in motion.
21. Your turn
I think it’s funnnier if you suggest the 21st inspiring image in the comments section, right at the end of this guide 🙂
Read this article, take action and share your photos with the tribe!
Special thanks to:
https://www.photopills.com/articles/star-trails-photography-guide