How to create Rembrandt light without studio lights
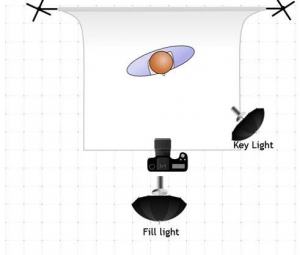
Like split light, Rembrandt light can be achieved using a single light source, which means it is ideal to use with window light. The only difference between taking a window-lit portrait Rembrandt style and shooting one with split lighting is the position of the subject relative to the window and the camera. Just as you would place a studio light at a 45 degree angle to your subject, you will also place your subject at a 45 degree angle to the window. On the opposite side, use the reflector to fill in the shadows a little, or leave out the reflector altogether for a more dramatic look.
You can use Rembrandt light in your outdoor portraits as well, but to use the light from the sun you have to make adjustments to the position of your subject relative to the light, until you see that characteristic triangle highlight appear on the cheek. When the sun is higher in the sky the light is harder, so you’ll get more defined edges to your shadows, and a more dramatic look. When the sun is lower in the sky, the Rembrandt lighting may still be apparent but it will be greatly deemphasized.
If you think back to our lesson about combining natural light and artificial light, you can also apply those techniques to Rembrandt lighting outdoors with the same tools. Place your umbrella and flash combination off-camera to the left or right side of the subject. For more drama, underexpose the background by around two stops or so, and use your flash/umbrella combination as the main or key light for the image. Again, you may need to make fine adjustments in order to get that important triangle of light to appear on your subject’s face.